Scooter Horn Repair and Replacement
While out riding recently I had the occasion to actually use the horn on my scooter - and of course, since I actually wanted to use it, it didn't work. So I thought this might be a good opportunity to describe the process of fixing it.
There are only three things that could be wrong,
- The horn itself could be broken
- The horn button could be broken.
- The wiring from the battery to the switch or from the switch to the horn could be broken.
So what I did was to remove a panel from the front fairing of the scooter to give me access to the horn as shown below on the right (it's the black circular thing with the silver disk in the center of it).
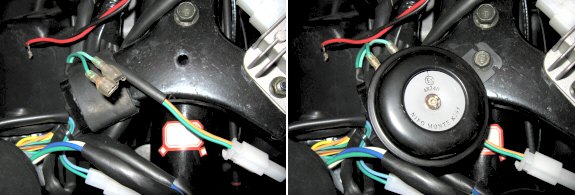
As you can see there are two green wires connected to the horn (they are more clearly visible above on the left, after the horn has been removed. I connected a voltmeter across the two green wired and pressed the horn button and I saw the reading go from 0v to 12v (approx), which told me that the wiring was OK and the horn button was OK, but the horn itself didn't seem to be working. If I had not seen 12v between the leads connected to the horn, the next thing I would have done would have been to measure the voltage at the horn button. One side should be connected to +12v and the other side should be at 0v with respect to the chassis. When the horn button is pressed, the side at 0v should go up to about 12v. If it stays at 0v, that would indicate a faulty switch.
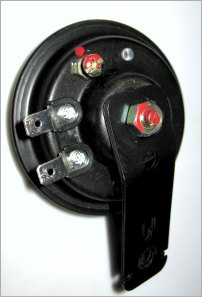 After removing the horn from the scooter, it looked like the illustration to the left. You can see the two terminals and the horn should sound when 12v is put across them. In this case it didn't.
You can also see two screws with red paint on them. One in the center of the horn and one at the top edge in the photograph. It turns out that by adjusting the position of those screws, you can "tune" the horn. The horn sees to be an old fashioned mechanical buzzer rather than an electronic device. When you apply power, current runs through a coil creating a magnetic field which pulls a diaphragm towards it. However when the diaphragm moves it breaks the circuit and it moves back. This makes the circuit again and so the diaphragm is pulled in again by the magnetic field and so on. The diaphragm moving back and forth causes the sound. The screws seem to adjust the point at which the circuit is made and broken. If they are badly adjusted either the circuit never makes or the circuit never breaks and so there is no sound from the horn.
I applied 12v to the horn and turned the screws until the noise was at its loudest. Then I tightened down the locking screws, made sure the horn was still working and replaced it in the scooter. It seems fine now. I don't know what sent it out of adjustment, but the problem was quite easy to fix. A dab of paint or glue on the screws might stop them from working loose (that was why the red paint was there in the first place).
If the horn had been broken, it's not hard to find some sort of replacement part. In fact some scooter owners might want to install a different horn anyway. Most scooter horns are rather anemic and high pitched. To get other drivers attention something louder, deeper and sounding like the horn on an 18-wheeler might do the job better!
Pretty much any horn designed for use with a car will be fine on a motorcycle, as long as there is enough room to mount it. Just about all run on 12v. You can typically find horns from around $10 up to about $100 for two-tone air horns. The smaller, cheaper ones are just fine for a scooter though.
Additional Resources